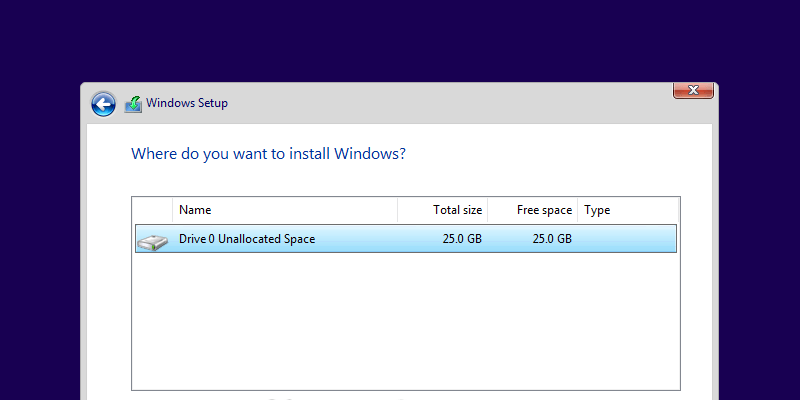
Installing Windows 10 on a PC is very simple. All you have to do is download Windows 10, create a bootable USB drive, insert it, and follow the wizard. While installing, Windows 10 asks you to select a partition. Generally, you just select a desired partition or disk from the list and Windows will do rest of the job.
However, sometimes Windows may show you an error message reading, “We couldn’t create a new partition or locate an existing one.” This error might happen for any number of reasons, even on perfectly functioning SSDs and HDDs. In those situations the following are things you can try to solve this error and proceed with the Windows 10 installation.
1. Disconnect Additional Hard Drives
Nowadays it is very common to use an SSD for Windows installation and a regular HDD for data storage. When using multiple hard drives, the first and foremost thing to do is disconnect all hard drives except the primary hard drive where you install Windows. Once you disconnect all your other hard drive(s), try to install Windows again and see if you can proceed with the installation.
2. Disconnect All USB Drives and Memory Cards
Other than the actual Windows 10 bootable USB drive, if you have any other USB drives and memory cards connected to your system, then on rare occasions Windows might confuse these drives for regular hard drives. Disconnect those additional USB drives or memory cards and try installing Windows again.
3. Use USB 2.0 Drive
If you are using a USB 3.0 bootable drive to install Windows, then it might also be a reason why Windows is giving you this specific error. To solve it you can try using a USB 2.0 drive.
4. Make Partition Active
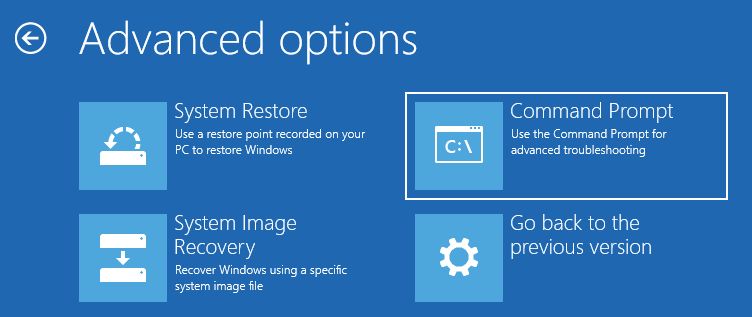
If the above methods didn’t work, then the partition you are trying to install Windows 10 might not be active. To make a partition active, you need to have access to the command prompt. To get access go back to the initial Windows installation screen and click on the link “Repair your computer.” Now, click on “Troubleshoot” and then click on the option “Command Prompt.”
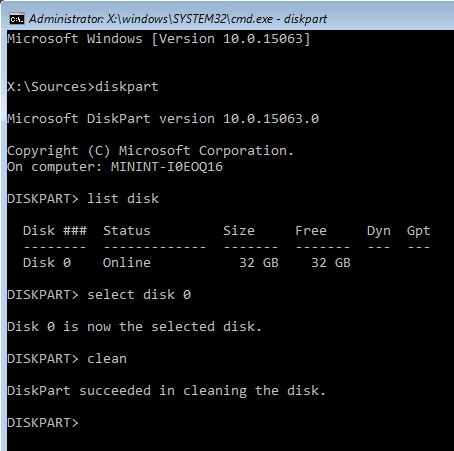
The above action will open the command prompt. Here type diskpart and press Enter. This opens the diskpart utility so that you can make the partition active.
Now, use the following command to list all the disks on your system.
list disk
After listing all the disks, find the disk you want to install Windows in. In my case the disk number is “0.” Type the following command to select the disk:
select disk 0
Dn’t forget to replace “0” with your actual disk number.
To clean the selected disk:
clean
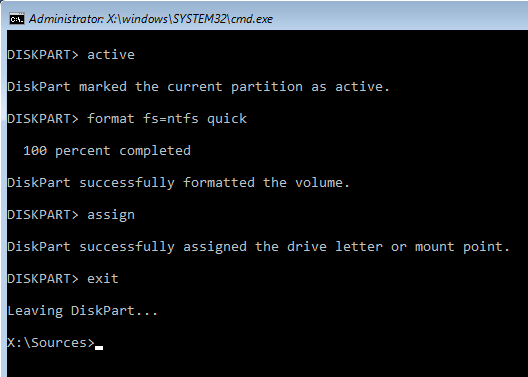
To make the disk primary, run the command
create partition primary
Activate the partition:
active
After activating, type
format fs=ntfs quick
to format it in the NTFS file system.
Now you can assign the disk by executing the command
assign
That’s it, execute the exit command twice to close the diskpart utility and command prompt.
After closing the command prompt, restart your machine and try to install Windows again.
That’s all there is to do. Comment below sharing your thoughts and experiences about using the above method to solve the “We couldn’t create a new partition or locate an existing one” error while installing Windows.

Vamsi is a tech and WordPress geek who enjoys writing how-to guides and messing with his computer and software in general. When not writing for MTE, he writes for he shares tips, tricks, and lifehacks on his own blog Stugon.
Subscribe to our newsletter!
Our latest tutorials delivered straight to your inbox
Sign up for all newsletters.
By signing up, you agree to our Privacy Policy and European users agree to the data transfer policy. We will not share your data and you can unsubscribe at any time. Subscribe