How to Draw Your Own Family Tree: A Step-by-Step Guide
How to Draw Your Own Family Tree is a wonderful way to explore your ancestry and create a beautiful visual representation of your lineage. Whether you’re curious about your roots or want to teach your children about their heritage, this project is both meaningful and educational.
To begin, research your relatives and gather as much information as possible. Once you have the details, you can start sketching the structure of your tree, carefully placing each family member in their rightful position. How to Draw Your Own Family Tree involves organizing names, adding dates, and designing an artistic layout that reflects your family’s history.
If you want a stunning and personalized result, consider incorporating photos, decorative elements, or even digital tools. No matter your artistic skills, following these steps will help you successfully complete your project. So, if you’ve ever wondered how to draw your own family tree, now is the perfect time to start!
Things You Should Know
- Start by researching your family history—talk to relatives or explore online databases to gather information on the family members you want to include in your tree.
- Lightly sketch the outline of your family tree using a pencil, beginning at the base and expanding outward and upward to form the branches.
- Arrange family members’ names on the branches, positioning older generations toward the bottom and younger generations higher up to reflect the lineage properly.
Part1Researching Your Family History

1. Ask Relatives and Use Online Resources to Research Your Family
Before designing your family tree, gather information on who will be included. Speak with your parents, grandparents, aunts, uncles, and cousins to collect details about your ancestors and their relationships. To dig deeper into your genealogy, explore online databases like FamilySearch.org for valuable historical records.
- Ask relatives about their siblings, children, parents, and any known ancestors. Collect names, birth dates, death dates, and any other relevant details.
- Cross-check information by speaking with multiple family members to ensure accuracy. If there are discrepancies, ask more detailed questions or consult additional relatives.
- For a more detailed tree, gather documents, photos, and origin details to enhance your representation of family history.

2. Decide How Far Back to Go
Determining how many generations to include depends on the size of your family and the space available for your tree.
- If your family is large, consider tracing back only a few generations, such as up to your grandparents and their siblings.
- For smaller families, you might extend the tree to include great-grandparents or even great-great-grandparents if records are available.
- If you wish to expand your family tree further, you can always add extra paper or use digital tools to extend your research.
Write down all the names you plan to include to estimate how much space your tree will require, ensuring a well-organized and visually appealing design.
Part2 Planning Your Drawing

1. Choose Paper and Drawing Materials
Selecting the right materials will make your family tree visually appealing and long-lasting. Opt for a large, sturdy sheet of paper like watercolor paper or poster board to ensure durability.
- Use markers, colored pencils, or watercolor pencils to add vibrant colors and intricate details to your tree.
- Consider incorporating decorative elements like calligraphy or embellishments to make your family tree stand out.
- For inspiration, check out creative family tree designs on Pinterest or explore artistic templates available on FamilySearch.org.
For more tips on designing a visually stunning family tree, visit our How to Draw Your Own Family Tree guide.
2. Decide Between an Artistic Tree or a Standard Genogram
Before you start drawing, choose the style that best represents your family history.
- Artistic Tree: This design mimics the shape of an actual tree, with branches representing family members. It’s a great option if you want a beautiful, decorative display.
- Genogram: A more structured approach using shapes and straight lines to map family connections. Unlike an artistic tree, a genogram doesn’t include a tree illustration, making it a clean and simple way to display family relationships. Learn more about genograms and their significance at Verywell Mind.
For a step-by-step guide on structuring your family tree, visit our How to Draw Your Own Family Tree tutorial.
Part3 Drawing the Tree

1. Sketch the Tree Lightly in Pencil
Before finalizing your family tree, lightly sketch it with a pencil to plan spacing and structure. This allows for easy adjustments if needed.
- Begin at the base of the tree and work upwards, drawing branches for each family member.
- Parents are typically placed at branch junctions, with their children’s names extending outward.
- Use your family member list to ensure accuracy and prevent any omissions.
For more detailed guidance, check out our How to Draw Your Own Family Tree tutorial.

2. Write Your Name on Your Branch
Since the tree revolves around you, start by placing your name near the bottom or center of the page.
- Older generations will be positioned below, while younger generations go above.
- Leave ample space for extended family members.
For more tips on organizing your tree, visit FamilySearch.org.

3. Add Your Parents and Siblings
Now, include your parents and siblings to expand the tree.
- Write your parents’ names directly above yours and your siblings’ names in line with your own.
- If you or your siblings have spouses or children, write their names accordingly.
- Use connecting lines to clearly define relationships.
Customize your tree for unique family structures by including step-parents, step-siblings, or guardians. To maintain clarity, list siblings in a consistent order, such as oldest to youngest from left to right.
For more on structuring your tree, visit How to Draw Your Own Family Tree.
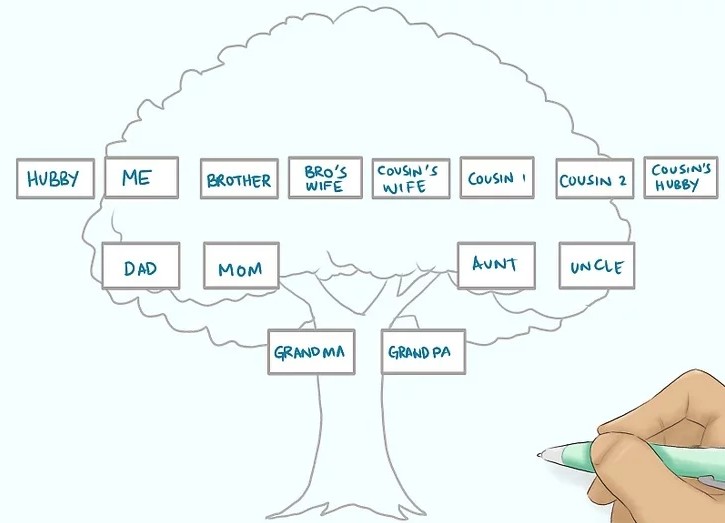
4. Write in Your Aunts, Uncles, Cousins, and Grandparents
This is where your tree starts to take shape.
- From your father’s name, branch out to his siblings (your aunts and uncles), their spouses, and their children (your first cousins).
- Do the same on your mother’s side, ensuring you include paternal and maternal grandparents at the appropriate levels.
- Use FamilySearch.org or Ancestry.com to explore deeper family connections.
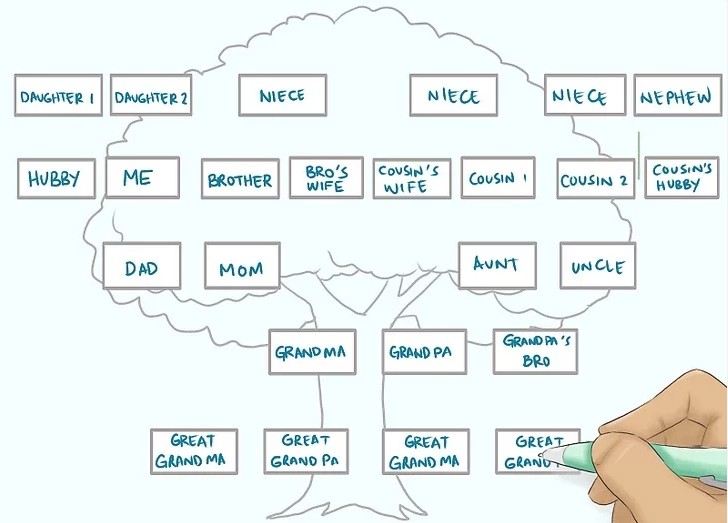
5. Include More Generations
Expand your family tree by adding older generations, including great-aunts, great-uncles, great-grandparents, and beyond.
- Place the oldest generation at the roots of the tree.
- If space runs out, consider extending onto another sheet or switching to a digital family tree tool.
For more on researching past generations, check out Ancestry.com.
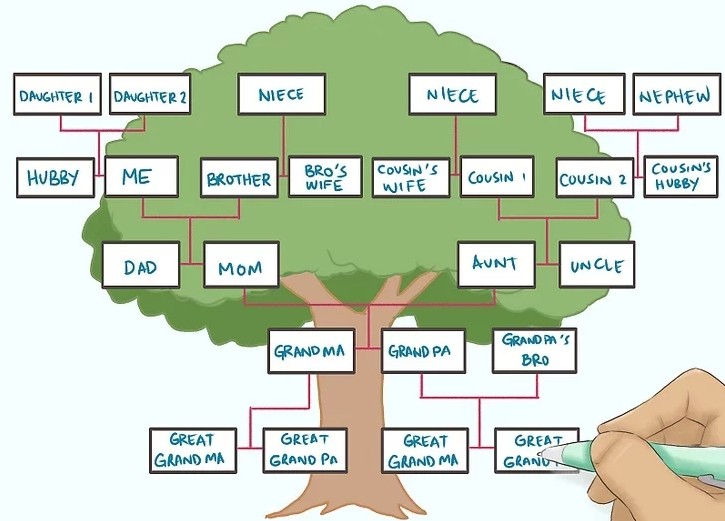
6. Enhance Your Tree with More Details
Once your structure is complete, refine your tree with ink, color, and decorative elements.
- Use shapes to differentiate genders: ovals for females, rectangles for males, and diamonds for unknown genders.
- Dashed lines can represent divorced couples.
- Include birth and death dates for a more historical perspective.
- Add extra biographical details such as birthplace, maiden names, or special achievements.
For more inspiration, visit How to Draw Your Own Family Tree or explore creative designs on Pinterest.