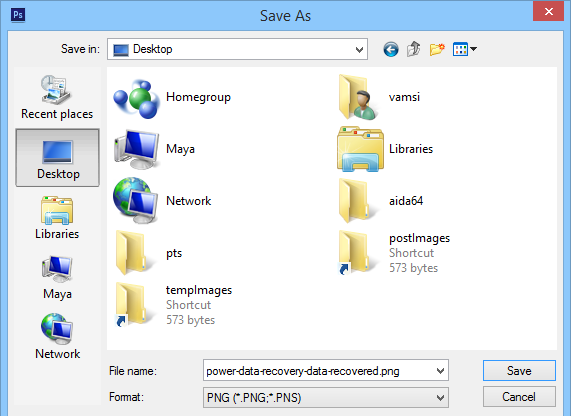
File Dialog box, or commonly known as Save or Open File Dialog box, is the most common window you will see whenever you are trying to save and/or open a file through a program in Windows. By default, Windows has two types of File Dialog boxes, one of which has a nice tree view with all the locations like the drives, favorites, network locations, etc. And the other one, which we are going to discuss, is more traditional and only has five locations in the Places Bar, i.e. Desktop, Recent Places, Network, My Computer and Libraries. How about adding your favorite, or a frequently accessed location to the Places Bar? Here is how you can do it with a simple registry hack.
Custom Shortcuts in File Dialog Box
Note: Before doing anything, make sure that you have a good backup of your Windows Registry, as we are going to create new keys and values. Any misconfigurations may result in system corruption.
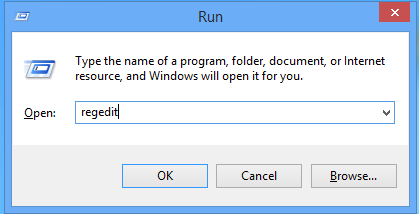
As I said before, we are going to deal with the traditional File Dialog box and creating your own shortcuts is fairly simple. First, press Win + R, type regedit and press the Enter button to open the Windows Registry Editor.
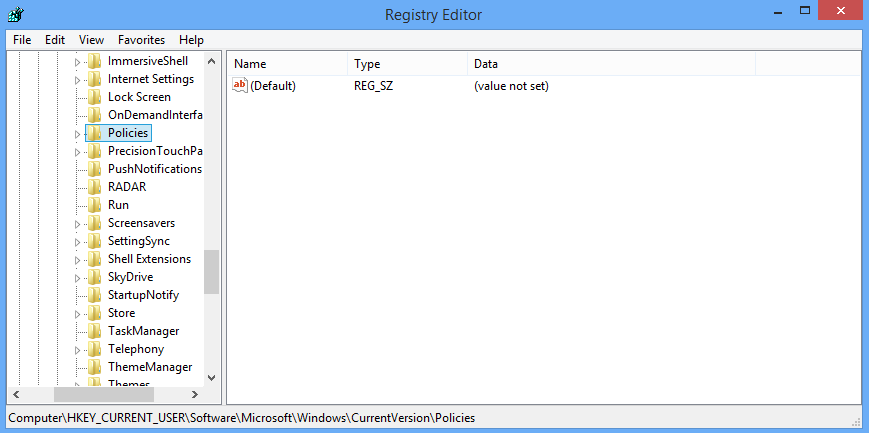
Once the Registry Editor has been opened, navigate to the following key located in the left pane.
HKEY_CURRENT_USERSoftwareMicrosoftWindowsCurrentVersionPolicies
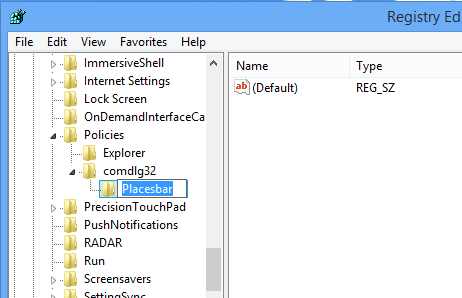
Now we need to create a couple of new keys in order to place the custom shortcuts. To do that, right-click on the “Policies” key, select “New -> Key” and name it as “comdlg32.”
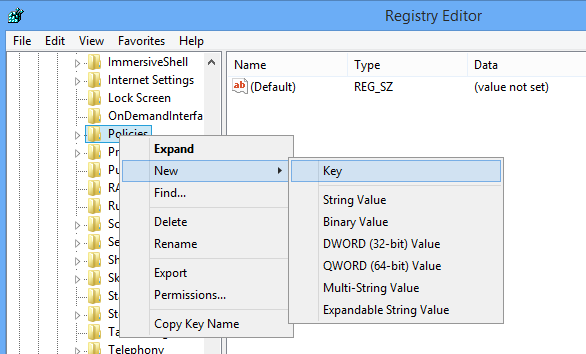
Again, right-click on the newly created key “comdlg32” and create a new key named “Placesbar.” Once the keys are created, this is how it looks in your Windows Registry.
Once the new keys are created, we need to create a new string. To do that, right-click on the right pane, select “New” and then the option “String Value.”

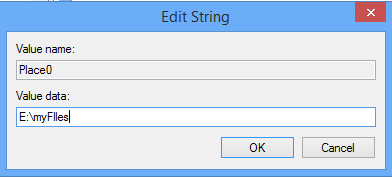
Name the new string value “Place0.” As the name suggests, this will be the first shortcut in the File Dialog box.

Double click on the string value “Place0” and enter the required folder path as the Value Data. For instance, I’ve entered my folder path as “E:myFiles” so that it will be the first shortcut that appears in the File Dialog box.
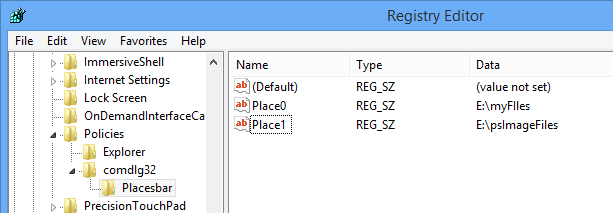
In the same manner, you can create as many shortcuts as you want. As you can see from the image, I’ve also created the second shortcut “Place1” with the Value Data “E:psImageFiles” so that the respective folder path will appear as a second shortcut in the File Dialog box. If you want to create more shortcuts, just create the new string values with the naming convention “Place2, Place3,” etc.
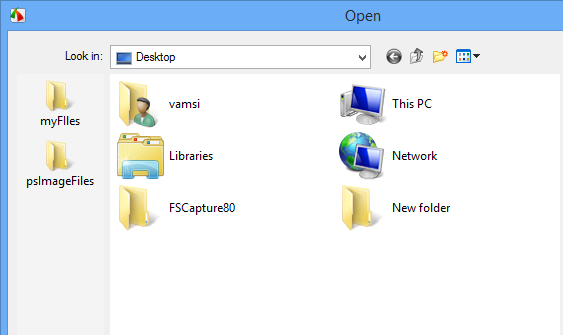
Once the shortcuts are created in the Windows Registry, this is how the File Dialog box appears from this point forward. As you can see, the old shortcuts are completely removed and are replaced with the ones we wanted.
That’s all there is to do, and it is that simple to add your own shortcuts to the File Dialog box. If you ever want to revert the changes to the default, simply delete the keys we just created and you are good to go. Once again, always be careful while you are deleting or modifying the keys and values.
Hopefully that helps, and do comment below sharing your thoughts on using this simple Windows Registry hack to add your own custom shortcuts to the File Dialog box.

Vamsi is a tech and WordPress geek who enjoys writing how-to guides and messing with his computer and software in general. When not writing for MTE, he writes for he shares tips, tricks, and lifehacks on his own blog Stugon.
Subscribe to our newsletter!
Our latest tutorials delivered straight to your inbox
Sign up for all newsletters.
By signing up, you agree to our Privacy Policy and European users agree to the data transfer policy. We will not share your data and you can unsubscribe at any time. Subscribe