
When you click on the network icon on your taskbar to connect to a WiFi network, Windows will show all the Available WiFi networks. This makes it easy to quickly choose a network and connect to it. However, if you have a lot of WiFi networks or access points near you, the network connections pop-up may look pretty cluttered, and you might have to do a lot of scrolling to find the access point you need. In those situations you can configure Windows to allow or block certain networks. This method is also helpful for blocking open WiFi networks that you don’t trust or WiFi networks that use inappropriate or unpleasant names.
Also read: How to Connect to Hidden Wi-Fi Networks on Windows
Block a WiFi Network
Windows doesn’t provide any options in the Settings app or Control Panel, but you can easily block a WiFi network using the Command Prompt. To block a WiFi network, all you need is the network name or SSID. You can get a WiFi network name by looking at the network connections pop-up. (Click on the network icon in the taskbar.) When you block a WiFi network, it will no longer appear in the network connections pop-up, and you won’t be able to connect to it.
To start, search for “Command Prompt” in the Start menu, right-click on it and select the option “Run as Administrator.”
In the command prompt window, execute the below command to block the WiFi network. Replace “WiFi Network Name” with the actual SSID or network name.
netsh wlan add filter permission=block ssid="WiFi Network Name" networktype=infrastructure
As soon as you execute the command, said WiFi network will be added to the blacklist filter, and you will be no longer be able to see or connect to it.

In the future, if you want to allow the WiFi network, all you have to do is to delete the entry from the blacklist. To do that, execute the below command while replacing “WiFi Network Name” with the actual blocked network name.
netsh wlan delete filter permission=block ssid="WiFi Network Name" networktype=infrastructure
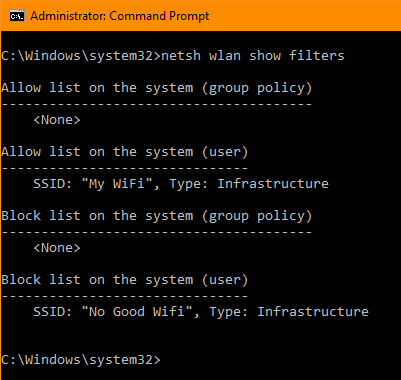
If you don’t remember the actual name, then use the below command. It will list the names of all the allowed and blocked WiFi networks.
netsh wlan show filters
Also read: How to Temporarily Disable WiFi in Windows 10
Allow a WiFi Network
Just as you can block select WiFi networks and allow all other networks, you can allow select WiFi networks and block everything else. This kind of whitelisting is useful when you want your system to only connect to the networks you trust.
Just like before, open Command Prompt with admin rights and execute the below command to allow a WiFi network. Replace “WiFi Network Name” with the actual SSID.
netsh wlan add filter permission=allow ssid="WiFi Network Name" networktype=infrastructure

If you have more networks, then repeat the command while replacing the name to add more WiFi networks to the whitelist filter. Once you are done adding, use the below command to block all other not-whitelisted networks.
netsh wlan add filter permission=denyall networktype=infrastructure
From this point forward, your system can only see and connect to allowed WiFi networks. If you want to block a previously allowed WiFi network, then all you have to do is delete that specific entry from the allowed list. You can do that by executing the below command.
netsh wlan delete filter permission=allow ssid="WiFi Network Name" networktype=infrastructure
In the future, if you decide you no longer have the need to whitelist specific networks and block all others, use the below command. It will delete the “deny all” filter and allow all WiFi networks along with the ones in the whitelist.
netsh wlan delete filter permission=denyall networktype=infrastructure
Comment below sharing your thoughts and experiences regarding using the above method to block or allow WiFi networks in Windows 10.
Image credit: Wireless Router by Sean MacEntee

Vamsi is a tech and WordPress geek who enjoys writing how-to guides and messing with his computer and software in general. When not writing for MTE, he writes for he shares tips, tricks, and lifehacks on his own blog Stugon.
Subscribe to our newsletter!
Our latest tutorials delivered straight to your inbox
Sign up for all newsletters.
By signing up, you agree to our Privacy Policy and European users agree to the data transfer policy. We will not share your data and you can unsubscribe at any time. Subscribe