When you have multiple user accounts on your Windows system, there will be times when you want to switch to another account without restarting the system or logging out of the current user account. In those situations, the Fast User Switching feature is pretty helpful as you can switch between different user accounts with just a click or two.
However, when you switch to a different user account you cannot properly shut down the system without losing the unsaved work on the other account. Moreover, all the signed-in accounts, regardless whether the user is actively using it or not, consume system resources. If you are not using the Fast User Switching feature or if you think it is not for you, here’s how to disable it in Windows.
Note: though I’m showing this in Windows 10, the same procedure is applicable to Windows 7 and 8.
Disable Fast User Switching – Group Policy Method
The Group Policy Editor provides an easy way to quickly disable fast user switching feature in Windows. To open the Group Policy Editor, search for “gpedit.msc” in the Start Menu and press the Enter key on your keyboard.

Here, navigate to “Computer Configuration -> Administrative Templates -> System -> Logon.”
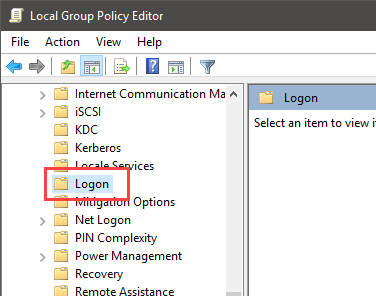
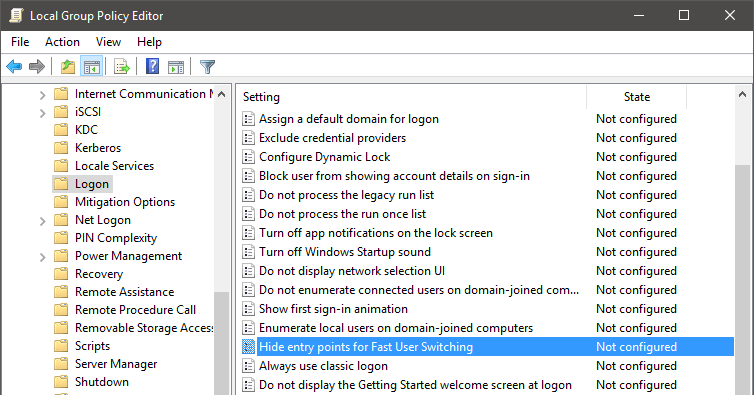
Find the policy “Hide entry points for Fast User Switching” in the right panel and double-click on it to open the policy settings.
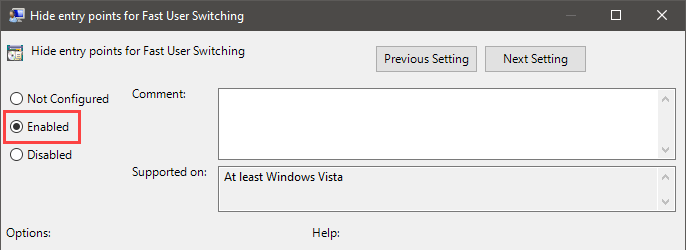
In the policy settings window select the “Enabled” checkbox and click the “OK” button to save the changes.
Just restart your system and you are good to go. If you don’t want to restart your system, then open Command Prompt, and use the below command. It will force-update the policy changes.
gpupdate.exe /force
If you want to change back to the default settings, select “Disabled” or “Not Configured” in the policy settings window.
Disable Fast User Switching – Registry Method
If you are using Windows Home version, then you won’t have access to the Group Policy Editor. However, you can use Windows Registry to do the job. To start, search for regedit and press Enter to open Windows Registry.

After opening Windows Registry, navigate to the following location. In Windows 10 you can simply copy the below path, paste it in the address bar and press the Enter button. It will automatically take you to the required key.
HKEY_LOCAL_MACHINESOFTWAREMicrosoftWindowsCurrentVersionPoliciesSystem

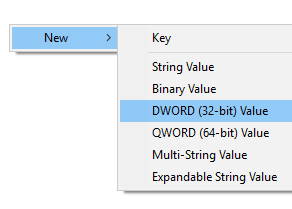
Right-click on the right panel and select the option “New -> DWORD (32-bit) Value.”
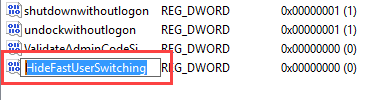
Name the new value as “HideFastUserSwitching” and press Enter to save the name.
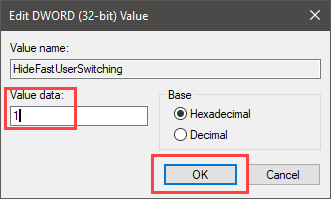
Double-click on the newly created value. In the Edit Value window enter the Value Data as “1” and click on the “OK” button to save the changes.
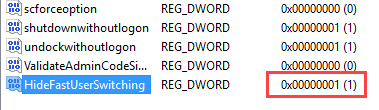
This is how it looks once you are done editing the Registry key.
Just restart your system and the Fast User Switching feature will be disabled. If you ever want to re-enable the feature, simply change the Value Data back to “0” and you are good to go.
Do comment below sharing your thoughts and experiences about using the above methods to disable Fast User Switching in Windows 10.

Vamsi is a tech and WordPress geek who enjoys writing how-to guides and messing with his computer and software in general. When not writing for MTE, he writes for he shares tips, tricks, and lifehacks on his own blog Stugon.
Subscribe to our newsletter!
Our latest tutorials delivered straight to your inbox
Sign up for all newsletters.
By signing up, you agree to our Privacy Policy and European users agree to the data transfer policy. We will not share your data and you can unsubscribe at any time. Subscribe